East Essex Smallholders Chitchat Headline Animator

CONTACT EESG

To Contact EESG
Please Email:
Danielle.Perkins@yahoo.co.uk
or 07854595640

Tuesday, 19 February 2013

Improving Ewe Nutrition for Better Returns

Several of us were talking about this fantastic booklet last night.


Hen Keeping Course - by Essex Wildlife Trust

10:00-16:00 HEN KEEPING FOR BEGINNERS

This course is for anyone who is thinking about or who has just acquired some hens. The course looks at the essential needs for the both hens and a new hen keeper. There will be plenty of opportunity to practice live hen holding and hen health checks. Tea, coffee and homemade cake provided…Free range eggs of course! Please bring a packed lunch. Donation £30.00 per person Booking Essential

http://www.essexwt.org.uk/eventsactivities/talks_and_courses/

Birds of prey poisoning figures a wake up call

Bird of prey poisoning figures 'a wake-up call'


Wednesday 13 February 2013
Maps showing where birds of prey have been poisoned should serve as a "wake-up call," Environment Minister Richard Benyon said today.

Red Kite
The maps, published for the first time by the Partnership for Action Against Wildlife Crime (PAW), highlight both the number and location of confirmed poisonings of birds of prey from 2007 to 2011 across England and Wales. In all, 101 cases of illegal poisoning were verified over the period.

Nineteen such incidents (in which 30 birds were killed) occurred in 2011, the last year for which data is available. Figures covering the same period released last year by PAW and the Scottish government revealed that sixteen birds of prey were poisoned in 2011 in the country; a total of 115 birds were shown to have been poisoned since 2007.

Commenting on the figures for England and Wales, Environment Minister Richard Benyon said, "I am appalled that these crimes continue to be committed and I am determined to stamp them out. Those responsible have no consideration for what they are killing or the impact their activities are having on wildlife and the wider environment.

"I want people to be alert to this problem and report their suspicions to the police. It is about time we put an end to this cruel and barbaric crime."

In May 2012, the environment minister, withdrew plans to capture buzzards and destroy their nests to benefit estates where game shoots take place, after the proposals proved wildly unpopular with the public. The minister had formerly sanctioned the plans, and said at the time "We need to understand better the whole relationship between raptors, game birds and other livestock."

Although Defra initially supported the measure, government documentation revealed the impact of buzzards on pheasant populations was not fully understood; Defra ministers were found to have relied on figures which showed 76 per cent of gamekeepers believe buzzards have an impact on pheasant poults, though data from consultancy ADAS suggested all birds of prey combined are responsible for the death of around 1 percent of poults, whereas road traffic claims many more.

The data on wildlife poisonings, released on Tuesday (12th February), show banned substances, including Carbofuran, or aldicarb, were used in the majority of poisonings.

Bob Elliot, RSPB head of investigations, commented on Tuesday, "These maps illustrate the problem that our birds of prey face. We need to remember, however, that the dots represent the tip of a much bigger iceberg as these criminal offences are often discovered by pure chance.

"These aren't just points on a map. Each dot represents a crime where a bird of prey has been killed in a calculated way. Birds of prey have suffered centuries of persecution, and these maps prove those attitudes still prevail today. We will continue to work in partnership to ensure that we all bear down on these unacceptable crimes."

In January this year, gamekeeper Robert William Hebblewhite from Scunthorpe was fined for possession of Carbofuran and poisoning two buzzards at Lincoln Magistrates' Court. The gamekeeper was found in possession of enough of the illegal poison "to kill all the birds of prey in a county," according to the RSPB.

Maps showing where poisonings occurred are available from PAW here

Monday, 18 February 2013

The Basics Of How to Plant Container Gardens

The Basics Of How to Plant Container Gardens By Mary Hanna

Another interesting article about growing in pots and containers.
Believe it or not, I've even grown runner beans in a large container. In fact you can grow most vegetables in a container so if you have no room for a vegetable patch, you no longer have an excuse!
All the information you need to know on how to plant Container Gardens. This article will show you how to plant successful and healthy Container Gardens.
When you are ready to mix ingredients, be sure the soil is damp and workable. To determine this, take a handful, squeeze it and allow it to drop. If water comes out, it is too wet; if it breaks apart, it is too dry. But if the lump of soil retains its shape or cracks just a little when it is dropped, it is in good condition to work.
Be certain gardening containers are clean when you start. Soak used or new clay pots overnight so they will not draw moisture from soil after planting. This is a very important step when you are beginning your plants life. If the pot draws off the moisture the new plant will be deprived.

Containers

There's a selection of special containers available for growing vegetables. If you have a metre square then you could use link-a-bord to create a large container or mini raised bed. Grow Pots enable you to maximise the availble compost when using growbags.
Though redwood, cedar, and cypress s may be left natural, they may also be stained or painted. First clean the surfaces then apply one or two coats of stain or paint. Let dry completely before planting.
Consider the shape of each, its color, and texture in relation to the color of flowers and foliage and the present as well as ultimate size of each plant. Don't choose material that is too small, and if you want a group of plants for a large, select one tall specimen for the center to give height and scale.
Keep in mind the form of plants, particularly the evergreens which stand out boldly in winter. Rounded types, as clipped yews or globe arborvitae, look well in angulars. Hollies or yews, sheared into squares or pyramids, look better in circular tubs. This contrast of the curving with the straight always gives interest to the garden and those guests that visit.
The first step in potting a container garden is to place sufficient drainage material in the bottom of each so that water can pass through freely, but not so much as to interfere with the roots. An inch or two of flower pot pieces (rounded sides up), or chips of brick or flagstone, pebbles, gravel, small stones, or cinders can be used. The larger the, the larger the pieces should be. Some gardeners spread a piece of coarse burlap and a layer of sand over large drainage pieces. A layer of Vermiculite or sphagnum moss over the drainage material is also fine to keep soil from clogging holes. If the holes clog the roots will drown.
Above the drainage, spread a layer of soil, the amount depending on the size of the root ball of the plant. Place the plant in position so that the surface of the soil will be an inch (more for big plants) below the rim of the pot. This space is needed to hold water.
Fill soil in around the roots, firming gently with your fingers or a piece of wood so as to eliminate air pockets. Do not make the soil too tight for fine feeding roots must be able to penetrate it with ease.
Finally, water plants well, let them drain. If water passes through the pot very rapidly, press soil again to firm it, that means there are air pockets. If the soil holds water too long, loosen it a little.
Place the plants in a sheltered spot out of sun and wind for the first week or so while they make new root growth and adjust to new conditions.
When your permanent trees, shrubs or perennials grow too large for their pots, shift them to bigger ones. Water them the night before so the soil will be moist for transplanting and won't cause you to tug hard to get them out. Dry soil tends to break apart, except on root-bound specimens.
Planting large specimens purchased in temporary s is a more involved process. If they are in baskets or boxes, these can be broken or torn apart, but be careful not to disturb the roots. Tins must be opened with tin cutters. To remove plants, put the cut s on their sides and pry steadily at the ball of soil gently in order not to break it. The less root damage the better the odds that the plant will be healthy.
All plants benefit from a mulch spread evenly over the surface of the soil. This will keep the soil cool and moist while keeping the weeds under control. Use peat moss, sand, gravel, stones, pebbles, buckwheat hulls, or Vermiculite. One of these will also give an attractive appearance but since the mulch conceals the soil, it is more difficult to determine when to water. Test by poking a finger through the material to touch the soil.
In the case of planters, again make certain drainage facilities are good. Usually there are holes at the base or sides. For best results, every four square feet should have a two-inch drainage outlet to keep those roots healthy.
Planters require day-by-day care to keep plants at their best. This means pruning, staking, spraying, feeding, and more particularly watering. Often planters are located under overhanging roofs or broad eaves. Wherever they are, do not depend on rain, but apply the hose as often as needed, which is usually daily and sometimes more often.

Sunday, 17 February 2013

Horsemeat and bute: Q&A

Horsemeat and bute: Q&A

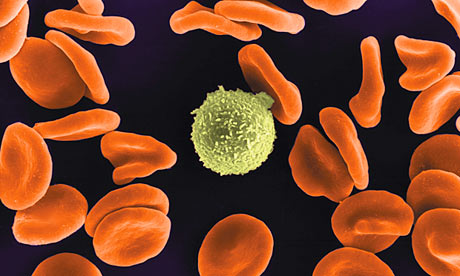
Red and white blood cells
Red and white blood cells. Bute can cause aplastic anaemia, in which the bone marrow fails to produce enough new blood cells. Photograph: G Wanner/Getty Images/ScienceFoto RM

Is horsemeat safe?

Horses are regularly treated with an anti-inflammatory drug called phenylbutazone, known as bute. However, bute is banned from the human food chain. No horse that has ever received the drug, no matter how long ago, is meant to be slaughtered for meat for human consumption. Since much of the trade in horsemeat that has been passed off as beef involves criminal activity, there are fears that those running the trade will have ignored food safety and hygiene regulations.

How dangerous is bute?

Bute can cause a potentially fatal blood disorder in humans called aplastic anaemia, in which the bone marrow fails to produce enough blood cells. Because it is not possible to say what triggers the disorder, it is not possible to identify a safe level of residue in meat.

What's the risk?

Aplastic anaemia is rare. Historic evidence suggests around one person in 30,000 exposed to bute when used as a human medicine suffered a serious side-effect, but they were exposed to significantly higher doses than any residue likely to have entered the food chain. Residues found in horses testing positive for bute have been a thousandth of the therapeutic human dose. The Food Standards Agency advice has been that the risk exists but is very low.

Why has the government chopped and changed on safety?

Until the authorities know the source of the horses that have illegally been used to adulterate cheap beef products, they cannot say whether they were checked for bute or not and therefore whether there is a food safety risk. Since no one was testing for horse in beef until recently, they were not testing for bute either. Last week the government changed the rules and decided that no horse slaughtered in the UK would be allowed to enter the food chain until it had been tested and cleared. Before that officials only ordered tests on horses whose passports looked suspicious. Results of the new tests were released on Thursday. Of 206 horses tested under the new regime, eight tested positive for bute.

Where does horsemeat come from?

The authorities are still struggling to identify the precise chain by which horsemeat got into supermarket and fast-food burgers and ready meals. But it is known that there is a substantial trade in horses with fake passports between Ireland and the UK. Animal welfare groups believe there are more than 70,000 Irish horses that have not been accounted for. Thousands of tonnes of horsemeat is also imported to Europe each year from North America and Mexico, usually through Belgium. The American trade has also been bedevilled with false documents and drug contamination.

Friday, 15 February 2013

How to Hatch Eggs

How to Hatch Eggs

Hatching eggs can be a very rewarding experience and many beginners are buying incubators since they have become far more affordable over the last few years. The main manufacturers for the hobby market seem to be R-COM and Brinsea Incubators and both produce an excellent range that can accommodate 20 to 25 chicken eggs, perfect for the beginner to hatch their own eggs!

Before you start

Before you incubate and hatch chicks, you should remember that you will end up with a ratio of half male and half female chicks. Unless you are hatching an autosexing breed (where markings or colour of the chicks are different colours) or have crossed two birds that give a sex-linked chick (again, different down colour or markings) then you will need to think ahead  to when the young growers can be sexed around 8 weeks of age and consider what you will do with the excess of male birds. Sadly, they are very hard to re-home, everyone has the same problem: too many boys.

Choice of incubator

incubatorPin It
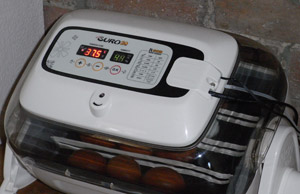
The R-Com Suro is a forced air incubator that controls both temperature and humidity.
There are essentially two types of incubator –still air and forced air. The big difference between the two is the forced air uses a fan which circulates the air inside. When you measure the temperature, it should be the same throughout. The still air incubator has a temperature gradient inside so the hotter air rises to the top and there can be several degrees difference between top and bottom. For the average beginner wanting to increase the size of their flock, a forced air incubator is in my opinion the best choice. If you can afford a model that has automatic humidity control then you should have far more success than setting and maintaining the humidity control on a manual unit.

Incubating Chickens Eggs

Chickens eggs have a 21 day incubation period (isn’t that amazing? Egg to chick in just 3 weeks!) and require a constant temperature of 37.5°C. Eggs will start to produce their own heat in the latter stages of development but the incubator thermostat takes care of this, keeping the temperature the same throughout the incubation period. Humidity should ideally be between 45 and 50%. Eggs need turning regularly by 180 degrees and you will need to do this yourself if the incubator doesn’t have an automatic turning mechanism. Expect 50% to 75% of your eggs to hatch, not all eggs will be fertile.

Hatching Eggs

Eggs need to be fertile so a cockerel needs to be running with the hens for a few weeks before eggs are taken for hatching. If you have a cockerel, you can collect your own hatching eggs from your chickens. Try to pick good looking ‘egg shaped’ eggs, this will help the chicks form and hatch correctly as mother nature intended. Keep nest boxes clean and don’t set any soiled eggs. If you don’t have a cockerel or would like a different breed, there are many hatching eggs for sale online on sites such as eBay but keep in mind that just about anyone and everyone sells eggs so birds vary in quality between sellers. Hatching eggs travelling through the postal system can be damaged internally and either not develop or die before they hatch. These are often called dead in shell.

Incubation tips:

  • Before you put your eggs into any incubator, make sure it has been sterilised with an incubation disinfectant (or as a minimum warm soap and water if you don’t have this). This will kill bacteria that multiply rapidly in the warm temperature of the incubator.
  • Plug in your incubator and make sure the temperature is steady at 37.5°C. Always leave it to run overnight to settle before putting eggs in.
  • Keep water reservoirs topped up so that adequate humidity can be maintained at all times.
  • Candle eggs before putting them into the incubator. Cracked or damaged eggs do not hatch and should be removed after candling (see below for more information on candling).

Candling Eggs

candlingPin It
Candling an egg in the dark using a special candling torch. Blood vessels and the embryo can be clearly seen after a week.
Fertility of eggs cannot be determined before incubating them. It is easiest to see development of the embryo after a week. The most critical period of incubation is the first week so if you do decide to candle your eggs before a week then be very careful with them and do not overheat them. Eggs with blood rings, cloudy eggs or clear eggs (infertile) should be removed when detected. The photo to the right shows an egg that was candled after 8 days. If you can’t see much, do this in the dark. It may also help to tip the egg gently from side to side so you can see the inside of the egg moving and see what are patches on the egg shell and what is inside. The developing spider like veins and a small dark embryo can be seen. If you look carefully and have a bit of luck with the positioning of the embryo, you can often see a small heart beating away. I usually candle after 7 days and again at around 14 days. There is more information on a separate page about candling eggs.

The Air Sack

An Air Sack is formed at the broad end of the egg shortly after an egg is laid. There is a membrane between this and where the chick is developing. When candling periodically through the incubation period, this is the best method of judging normal development and you will see this increase in size up until the point that the chick breaks through into this air sack.

The Hatch

  • A chick will usually ‘pip’ the shell a few hours after breaking into the air sack so she can breathe but a full hatch can take 12 or more hours from this point so be patient.
  • If humidity has been set too high during the incubation period, the chick may pip the shell underneath the shell and drown in the fluids before he can get his beak out of the shell.
  • If the humidity has been too low, the air sack will be too large and the chick will be under-developed  and may become stuck to the shell, too weak to break free.
If a chick has pipped but does not make any progress, wait 12 hours, then consider breaking the top part of the shell away (but no more…) Some say do not help weak chicks as you are breeding weakness into your flock but there are many reasons why eggs don’t hatch. If it is a humidity problem like this or the line is particularly in-bred (often found with exhibition strains) then a little help can usually be given without detrimental effect.

And finally…
  • Do not remove hatched chicks until they are fully dried out. Chicks do not need to eat for 24 hours. This is why they can be shipped around commercially as ‘day old chicks’.
Good luck with your hatch!

Source: http://keeping-chickens.me.uk/chickens/how-to-hatch-eggs

Lambing Equipment List - The Smallholder Series

Lambing Equipment List - The Smallholder Series

With lambing due to start, i'm sure we all want to be prepared, here is a very good list of equipment.


Source: www.thesmallholderseries.co.uk